
Ever looked at a workshop tool and thought, "Huh, wonder how that thing actually works?" Today, we're taking a chill peek behind the curtain of a real workhorse: the drill press. Forget intimidating diagrams; we're approaching this with a relaxed, curious vibe, like exploring a cool invention. Ready to demystify it?
The Foundation: Keeping Things Steady
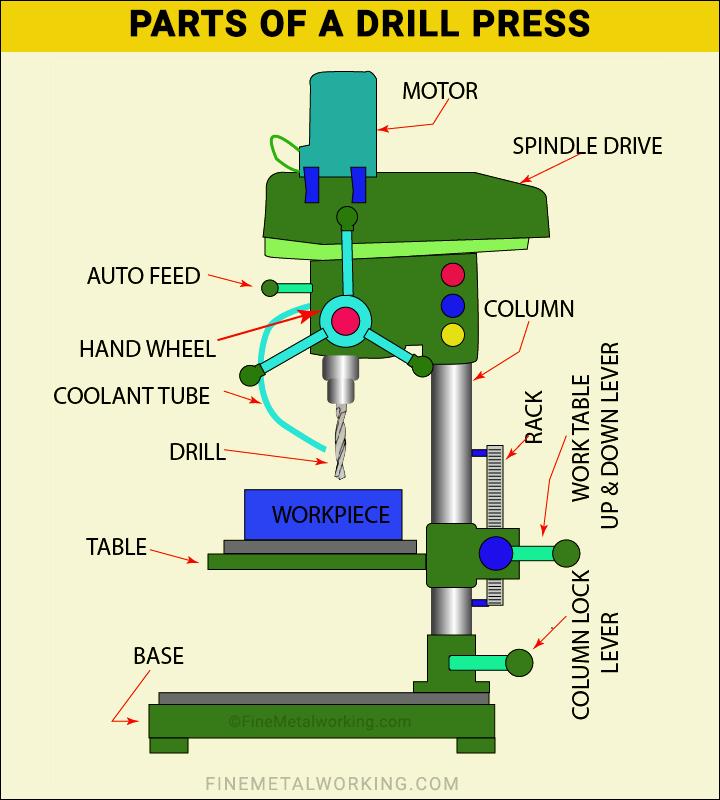
First up, the Base. Every great structure needs a solid footing, right? This heavy, cast-iron slab is the anchor of the whole operation. Without it, things would be wobblier than a toddler on a skateboard! It's crucial for stability, especially when drilling tough materials. Simple, yet incredibly important for precision.
Rising from the base is the Column (or Pillar). This sturdy metal pole is the drill press's spine, holding everything up. It's the central support, connecting the top, where the drilling action happens, to the bottom. Without it, the entire machine would just flop over. Think of it as a sailboat's mast, giving structure and height.
Where the Work Happens: The Table
Now, the Table is where your workpiece sits – whatever you're drilling into. This flat, cast-iron surface adjusts up and down the column with a crank handle and locks in place. Lower it for tall items, raise it for small ones. It often tilts or rotates too, offering incredible flexibility for angled holes. It’s like having an adjustable precision workbench!
The Brains and Brawn: The Drill Head
Okay, let's get to the juicy bits – the Drill Head. This is the main event, packed with all the components that make the drill press actually, well, drill!

Inside the head, you'll find the Motor. This is the heart of the machine, providing all the rotational power. Usually an electric motor, it quietly (or not so quietly!) buzzes, ready to spin that drill bit. Without it, you'd just have a very fancy, stationary metal sculpture.
Connected to the motor, often via a belt and pulley system, is the Spindle. Think of the spindle as the main rotating shaft that transmits the motor's power directly to your drill bit. It's the part that truly gets spinning!
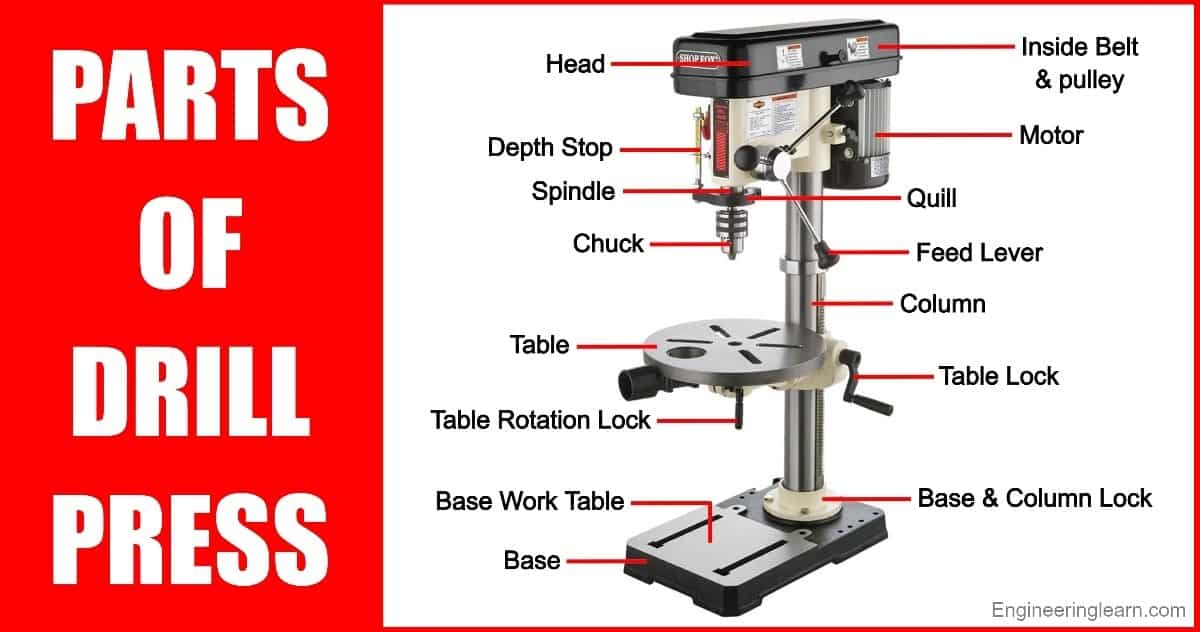
And what holds the drill bit? That would be the Chuck. This is a special clamp with jaws that tighten around the bit's shank, holding it securely. It's like the drill press's super-strong hand, gripping the tool tightly so it doesn't fly off. You usually tighten it with a chuck key.
Now, how does the drill bit move up and down? That's the job of the Quill. This housing moves the spindle and chuck assembly vertically. Imagine an elevator shaft for your drill bit! This vertical movement allows you to plunge the bit into your material with precise control.
Controlling that plunge is the Feed Handle (sometimes Quill Handle). This is usually a set of three spokes or a lever that you pull down to lower the quill and drill bit. It gives you incredible manual control over the drilling process, letting you apply just the right pressure. It's your direct interface with the action.
For even more precision, most drill presses have a Depth Stop. This brilliant mechanism lets you pre-set exactly how deep your drill bit will go. No more guessing or drilling straight through your workbench! It's like setting a maximum speed limit for how far down your drill can travel. Super handy for consistent holes.

Controlling the Speed: The Guts
Many drill presses use a belt and pulley system to change speeds. Moving a belt between different-sized pulleys makes the drill bit spin faster or slower. This is cool because different materials and bits need specific speeds for optimal, safe drilling. It’s like changing gears on a bike – more power for hard materials, higher speed for softer ones. Some modern presses have a variable speed dial for electronic control.
Why Bother Knowing All This?
So, why did we just go on this mini-adventure through a drill press diagram? Because understanding these core parts isn't just academic. It helps you appreciate the ingenious simplicity of its design, use the tool more safely, and get better results. When you know what each part does, you can troubleshoot better, maintain the machine, and choose the right drill press for your projects.
It’s about demystifying the tools around us, turning a complex-looking machine into understandable, purposeful components. And honestly, isn't it just inherently cool to know how things work? Now, go forth and look at every tool with renewed curiosity!