Alright, picture this: It was a beautiful, crisp autumn weekend, perfect for finally tackling that ridiculously ambitious outdoor lighting project for my patio. I had grand visions of a string of super-bright LEDs that would make my backyard look like a scene from a fancy movie. I bought the lights, I bought a couple of nice, hefty 12-volt batteries, and I was all set. Or so I thought.
I wired up one battery, and sure, the lights came on. But they were… meh. Not the dazzling display I’d imagined. More like a sad little glowworm convention. I fiddled, I prodded, I even offered encouraging words to the LEDs, but nope. My fancy lights, it turned out, needed a bit more oomph than a single 12-volt battery could provide. They wanted 24 volts, and I was staring at my two 12-volters, wondering if I'd just bought a really expensive set of paperweights. This, my friends, is where the magic (or rather, the science) of wiring batteries in series came galloping in on a white charger cable.
Ever been in a similar spot? Needing more voltage, not necessarily more run-time? Maybe for an RV, a golf cart, or like me, just to make your patio look less like a forgotten alleyway? Well, buckle up, because we're about to dive into the surprisingly straightforward (but incredibly important to get right!) world of how to wire two batteries in series. It's like giving your electrical system a power-up, a little voltage boost that can make all the difference.
What Even Is Wiring in Series?
Think of it like building a staircase. When you wire batteries in series, you’re essentially stacking their voltages on top of each other. If you have two 12-volt batteries, wiring them in series gives you a combined 24-volt system. The cool thing? Your amperage (think of it as capacity or how long the power lasts) stays the same as a single battery. So, two 12V 100Ah batteries in series become a 24V 100Ah system. Got it? More voltage, same capacity. Perfect for those high-voltage demands.
First Things First: Safety is Sexy (and Smart!)
Before you even think about touching those terminals, let's have a little chat. Electricity, especially when we're talking about batteries that can deliver significant current, is no joke. We're not playing with LEGOs here. So, please, for the love of all that is shiny and un-fried:

- Always work in a well-ventilated area.
- Wear safety glasses (seriously, don't skip this).
- Gloves are your friend, especially if you're dealing with lead-acid batteries.
- Disconnect everything from any loads before you start.
- Ensure your batteries are the same type, voltage, and preferably, capacity and age. Mixing and matching is a recipe for disaster and can lead to uneven charging and premature battery failure.
- Have a fire extinguisher nearby, just in case.
Yeah, I know, a lot of warnings. But trust me, a few minutes of caution now can save you a whole lot of headache (and maybe a new pair of eyebrows) later.
What You’ll Need: Your Wiring Arsenal
Gather your supplies, intrepid electrician:
- Two Batteries: Remember, identical ones are best. If they're 12V, they should both be 12V. If they're deep cycle, both should be deep cycle.
- Connecting Cable: This is the cable that links the two batteries together. Make sure it's appropriately gauged for the current your system will draw. Thicker is generally better.
- Output Cables: These will connect your newly beefed-up battery bank to your device or system.
- Terminal Connectors/Lugs: To ensure solid, secure connections.
- Wrench or Socket Set: For tightening those connections.
- Multimeter: Your best friend for verifying your work and checking voltages. Don't skip this!
The Nitty-Gritty: How to Hook 'Em Up
Ready? Let's get wiring!

Step 1: Identify Your Terminals
Each battery will have a positive (+) terminal and a negative (-) terminal. They're usually clearly marked. If not, the positive is often slightly larger or might have a red cap/label, and the negative a black one. Take a moment, double-check.
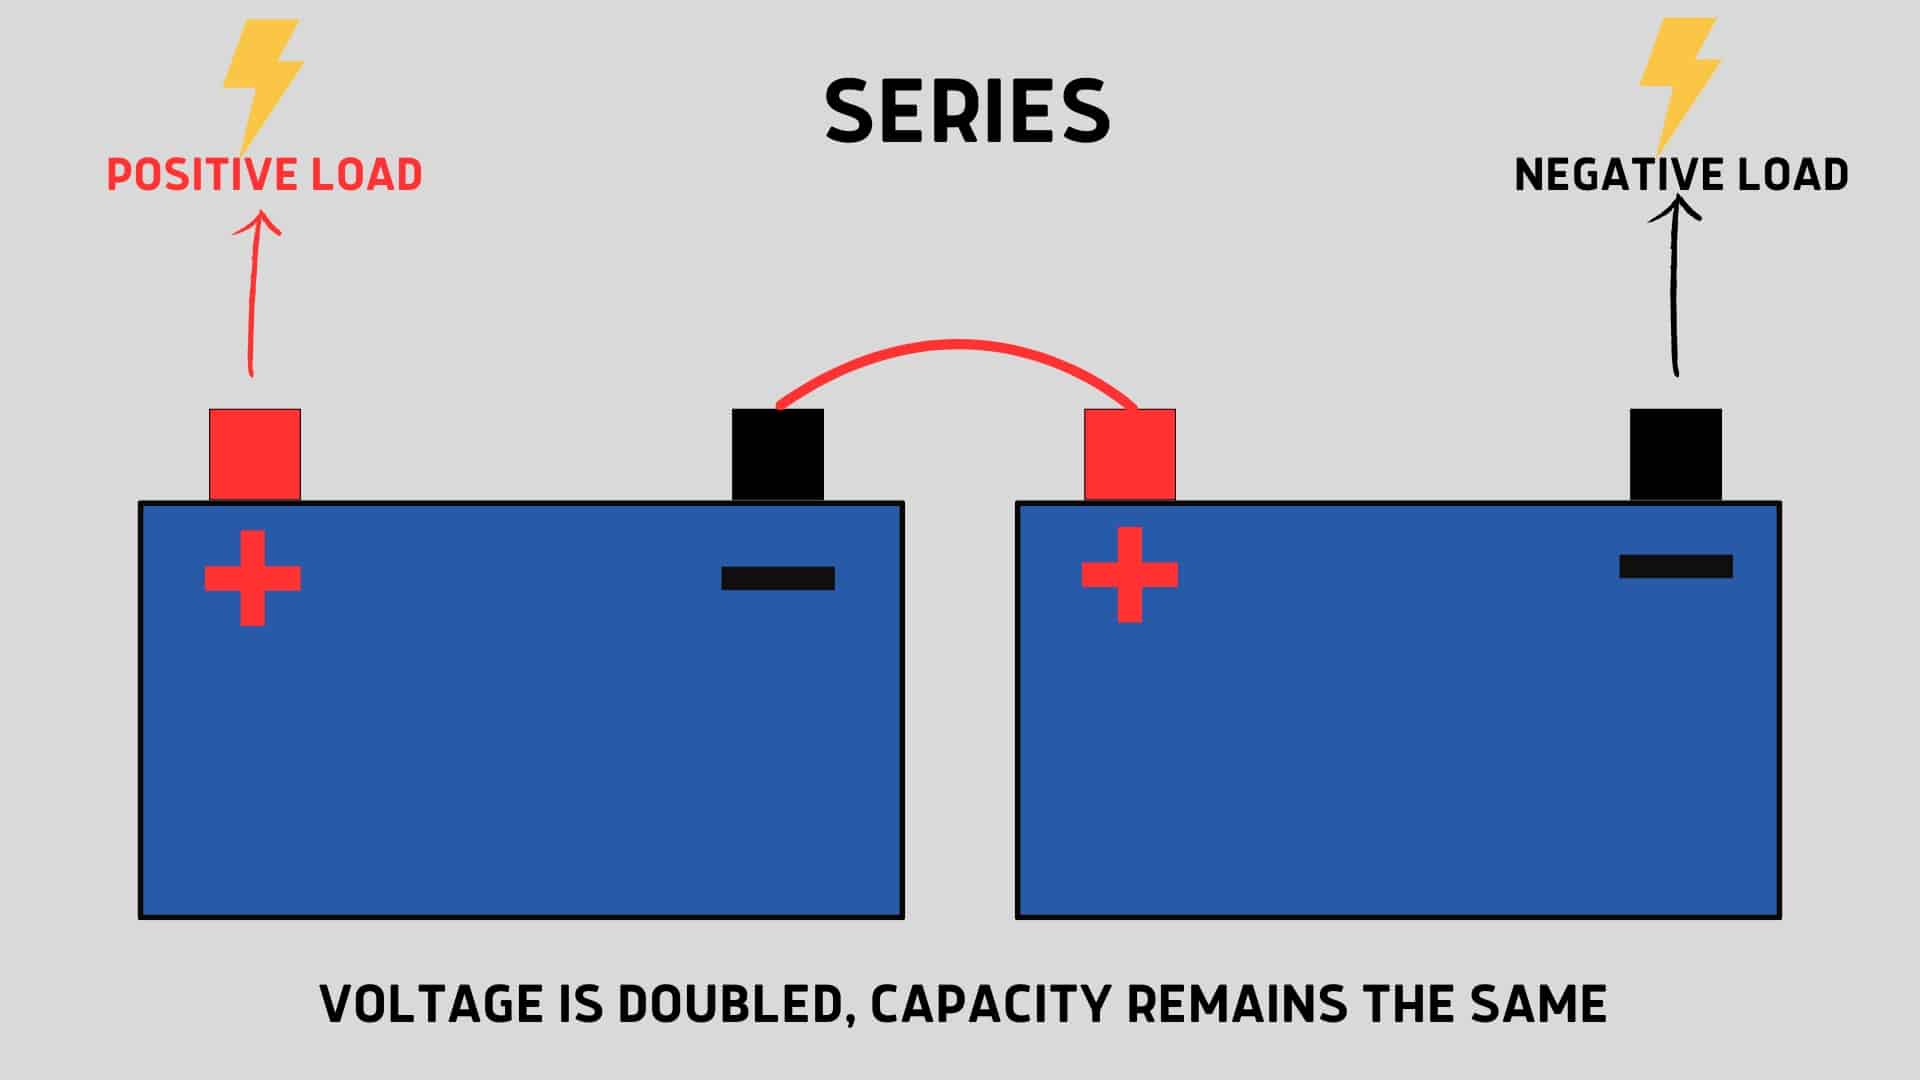
Step 2: The Series Connection – This is Key!
Take your connecting cable. You're going to connect the positive terminal of Battery 1 to the negative terminal of Battery 2. Yep, you read that right. It's like shaking hands between the two batteries. This connection forms the "series."

Think of it visually: Imagine Battery 1 on the left, Battery 2 on the right. You’re running a cable from the + on Battery 1 to the - on Battery 2.
Step 3: Identify Your New System Terminals
Now that you've made that central connection, you'll have two "free" terminals left:
- The negative terminal of Battery 1 (which hasn't been connected yet).
- The positive terminal of Battery 2 (which also hasn't been connected yet).
These two are your new system's output! The negative terminal of Battery 1 is now your system's overall negative, and the positive terminal of Battery 2 is your system's overall positive.

Step 4: Connect to Your Load
Using your output cables, connect the system negative (from Battery 1's negative) to the negative input of your device/system, and the system positive (from Battery 2's positive) to the positive input of your device/system.
Step 5: Verify With Your Multimeter
Before you power anything up, take your multimeter. Set it to measure DC voltage. Place the red probe on your system's positive output terminal and the black probe on your system's negative output terminal. What should you see? If you started with two 12-volt batteries, your multimeter should read approximately 24 volts (it might be 25V or 26V if the batteries are freshly charged). If it reads 0V, 12V, or something wildly different, STOP. Recheck your connections immediately. If it reads a negative voltage, you've likely reversed your multimeter probes, but your connections might still be correct. Always confirm.
A Few Last Thoughts Before You Go Get Your Voltage On
- Charging: Remember, you now have a higher voltage system! Your charger must be compatible with the new total voltage (e.g., a 24V charger for a 24V system). Using a 12V charger on a 24V bank is a no-go.
- Maintenance: Keep those terminals clean and connections tight. Loose connections generate heat, and heat is the enemy of batteries (and pretty much everything else electrical).
- Balanced Batteries: This is why matching batteries is so important. If one battery is weaker, it will drain faster and get overcharged/undercharged, potentially damaging both batteries over time.
And there you have it! Your very own, higher-voltage battery bank, ready to power those demanding devices. My patio lights? They're now practically blinding, in the best possible way. Yours will be too, or whatever awesome project you've got cooking. Go forth and voltage-up, safely!