
Alright, fellow adventurers of the high seas (or even just the tranquil lake)! Ever felt that little tug, that whisper from your boat, saying, “Hey, a bit more power would be nice, wouldn’t it?” Well, buckle up, buttercup, because we're about to give your vessel an energy upgrade that’ll make it purr like a happy sea-lion! We're talking about wiring up a dynamic duo of batteries, not because you're planning an oceanic crossing, but because more juice means more fun, more tunes, and more peace of mind!
Your Super-Powered Prep Party!
Before we turn into magnificent marine electricians, let's gather our trusty gear. Think of this as collecting ingredients for the world's most epic boat-power smoothie. Safety first, always! Like a super-spy getting ready for a daring mission, you'll want some eye protection and sturdy gloves. Nobody wants a shock, or a spark, or a grumpy battery spitting at them. This isn’t a battle, it’s a beautiful ballet of connections!
Here’s your treasure chest list:
- Two gleaming marine batteries (the stars of our show!).
- A fantastic battery switch (this is your boat's energy traffic cop, directing power like a pro!).
- A bundle of lovely, flexible marine-grade battery cables (these are the super strong veins of your power system!). Make sure they're the right size – think thick, not flimsy spaghetti!
- A handful of lugs and heat shrink (for neat and tidy connections, because sloppiness is for landlubbers!).
- Some basic hand tools: a trusty wire crimper (to make those connections rock solid), a wrench (for tightening those terminals), and maybe a cable cutter if your cables aren't pre-made.
Pro Tip for the Enthusiastic Amateurs: Always, and we mean always, disconnect the existing battery's negative terminal first if you're working on an already wired system. It's like politely asking the power to take a nap before you start rearranging the furniture!
The Grand Connection! Let's Link 'Em Up!
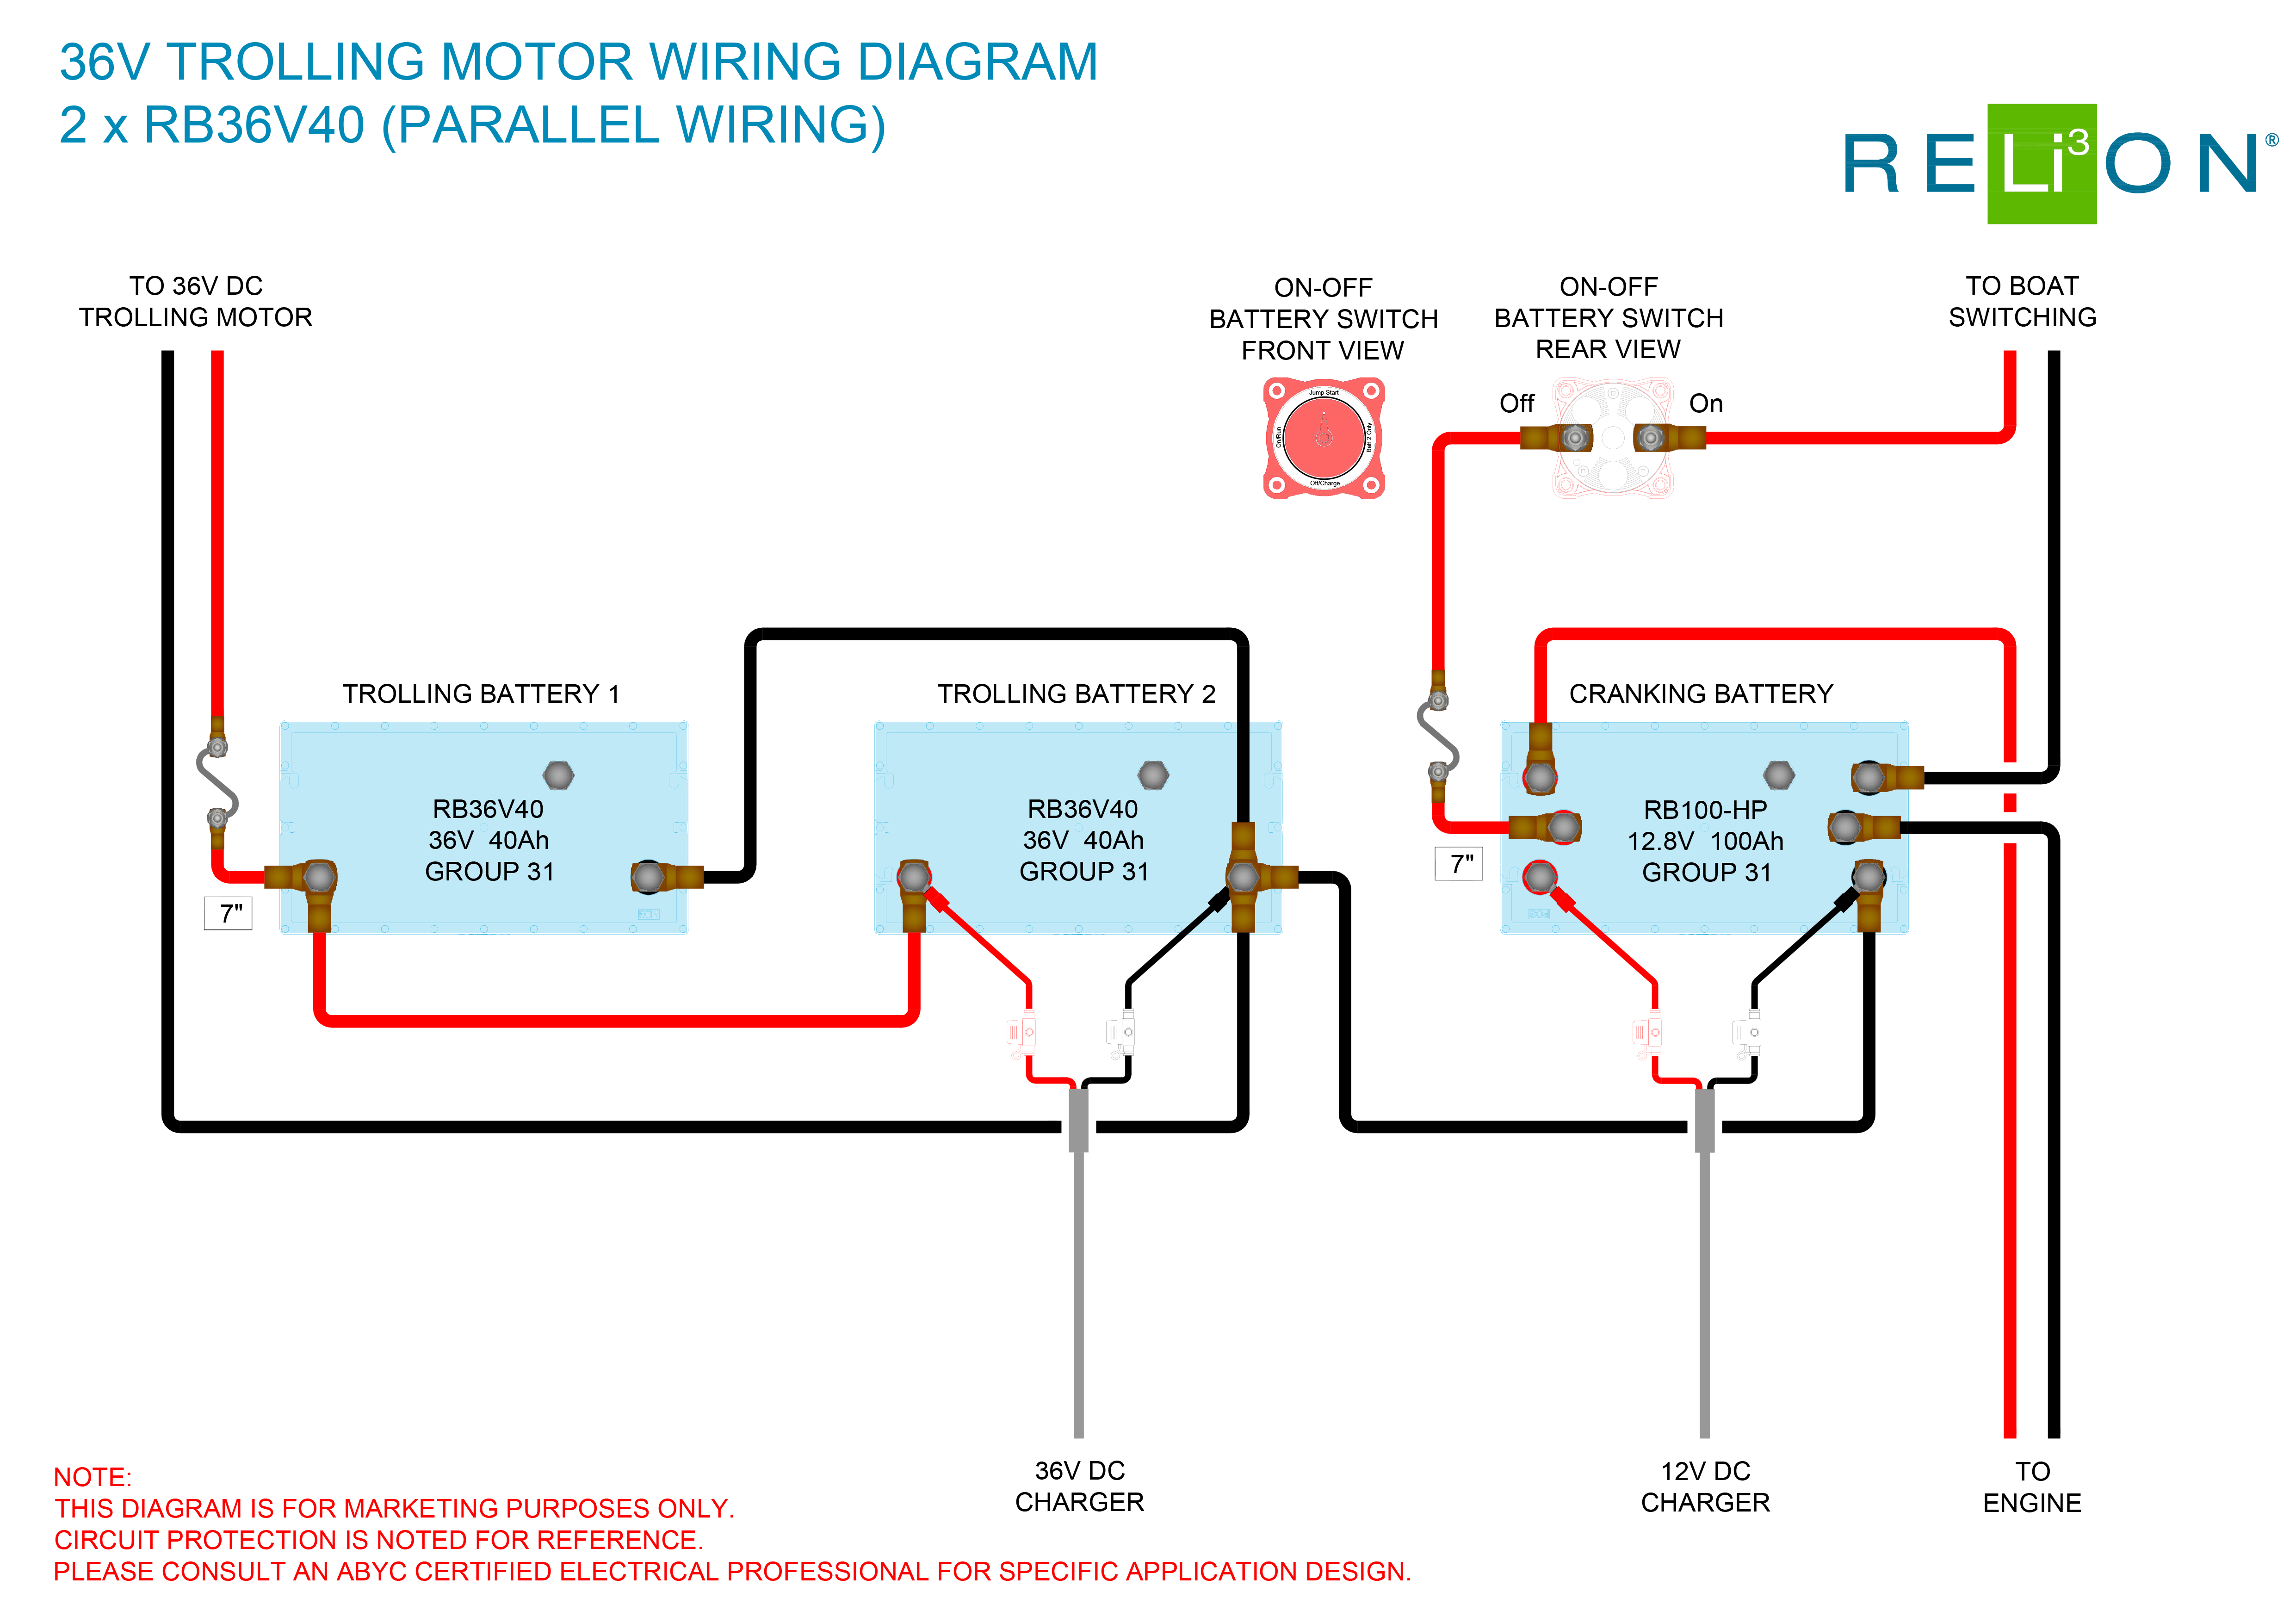
Okay, deep breaths! This is where the magic happens. We're going to connect these two batteries in what's often called a parallel setup. Imagine your batteries are best friends, holding hands, ready to share their energy party equally. This gives you more run-time, so your boat can keep the good times rolling longer!

Step 1: The Battery Best Friend Link
First, grab one of your lovely marine-grade battery cables. This cable is going to be the friendship bracelet between your two batteries. Look for the big, bold positive (+) terminal on your first battery. It usually has a red cap or a big plus sign. Connect one end of your cable there. Now, find the positive (+) terminal on your second battery and connect the other end of that cable there. You've just linked their sunny sides!
Next, do the exact same thing for the negative (-) terminals. Grab another cable, connect one end to the negative (-) terminal of the first battery, and the other end to the negative (-) terminal of the second battery. These are the "chill out" sides, happily joining forces. See? They're now a united power team, ready to roll!
Step 2: Introducing the Traffic Cop (Battery Switch)
Now, let’s get that brilliant battery switch into play. This glorious gadget is your command center, letting you pick which battery is doing the heavy lifting, or even both at once!
You'll typically see connection points labeled on your switch, often "BAT 1," "BAT 2," and "COMMON" or "LOAD."
- Take another positive (+) battery cable from the first battery's positive terminal and connect it to the "BAT 1" post on your switch.
- Then, grab another positive (+) battery cable from the second battery's positive terminal and connect it to the "BAT 2" post on your switch.
You're essentially telling the switch, "Here's the power from battery one, and here's the power from battery two. You decide where it goes!"
Step 3: Plugging into Your Boat's Super Highway
Almost there! Now, we need to connect our awesome power system to your boat's main electrical system. This is where your boat will draw its energy from.
- From the "COMMON" or "LOAD" post on your battery switch, run a single positive (+) battery cable to your boat's main positive distribution point (often a breaker panel or main fuse block). This is the power going out to your boat.
- Finally, you need a main negative connection. Run a big, strong negative (-) battery cable from the negative (-) terminal of one of your batteries (since they're connected in parallel, it doesn't really matter which one you pick) to your boat's main negative bus bar or a good, clean chassis ground point. This completes the circuit, allowing the power to flow beautifully.
Double Check Delight: Before you even think about flipping that switch, stand back and admire your work. Go over every single connection. Are the positive wires only touching positive terminals/posts? Are the negative wires only touching negative terminals/posts? Are all the connections snug as a bug in a rug? Loose connections are the arch-nemesis of happy boaters!
The Moment of Truth!
You’ve done it! You’ve bravely ventured into the world of boat wiring and emerged victorious! Now, with a triumphant grin, you can carefully turn your battery switch to "Battery 1," or "Battery 2," or even "ALL" (if your switch has that option) and watch your boat's lights glow, your stereo hum, and your engine crank with renewed vigor! You're not just wiring batteries; you're unlocking more adventures, more relaxation, and more pure, unadulterated boating bliss!
