Ever found yourself admiring a beautifully crafted metal piece, perhaps a sleek railing, a sturdy gate, or even the hidden welds holding together something far more significant, like a bridge? There’s a quiet satisfaction in knowing something is built not just to look good, but to last. And behind every great weld, there's often a little hero ensuring its quality: the fillet weld gauge. Now, don't let the technical name intimidate you. Think of this tool not as a dry, industrial contraption, but as your personal curator of weld perfection, a savvy sidekick in your journey to become a true metal maestro.
What's the Big Deal with a Fillet Weld Gauge, Anyway?
Imagine baking a cake without knowing if your oven is at the right temperature or if your ingredients are precisely measured. You might end up with something… edible, perhaps, but certainly not a showstopper. A fillet weld gauge is essentially the baker's thermometer and measuring cups for welders. It's designed to quickly and accurately check the dimensions of a fillet weld – those triangular welds commonly found when joining two pieces of metal at a right angle.
Why bother? Because the size and shape of a weld directly impact its strength and integrity. Too small, and it might fail under stress. Too big, and you're wasting material and time, plus it might even lead to unwanted distortion. This little gadget helps you hit that sweet spot, ensuring your welds are not just strong, but also beautiful and efficient.
Getting Acquainted with Your Gauge
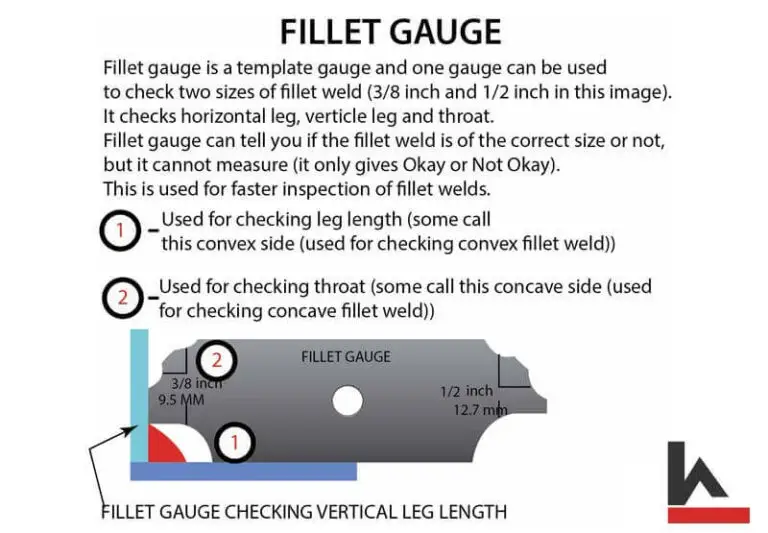
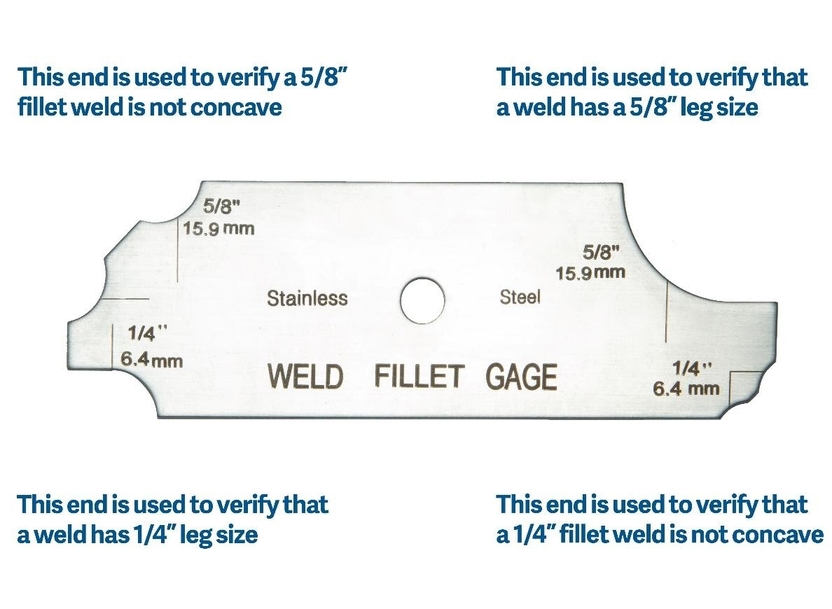
Fillet weld gauges come in various shapes and sizes, but they all share a common purpose. You might encounter individual leaf-style gauges (like a tiny set of rulers, each marked for a specific weld size) or a more versatile "Bridge Cam" style gauge, which is a Swiss Army knife of weld inspection. Whichever one you have, it's designed with precision-machined edges and angles to measure crucial aspects like leg length, throat thickness, and even detect issues like undercut or overlap. Think of it as a specialized ruler, ready to give your weld a quick, professional health check.
The Nitty-Gritty: How to Use It Like a Pro
1. Clean Your Canvas
Before you even touch your gauge, make sure the weld and surrounding area are clean. Remove any slag, spatter, or grime. You wouldn't measure a dress with crinkles and folds, right? A clean surface ensures accurate readings.
2. Measure the Leg Length
The leg length is probably the most commonly checked dimension. It's the distance from the root of the weld to the toe of the weld on either leg. If you're using individual gauges, simply find the gauge that fits snugly against the weld's profile, touching both the vertical and horizontal plates. For a Bridge Cam, you'll slide its specific leg-measuring feature into place. Aim for a zero gap between the gauge and the weld surface. That's your leg length!
Fun Fact: Just like a perfectly tailored suit, a weld's leg length needs to be just right. Too short, and it's like wearing trousers that are too high-water!
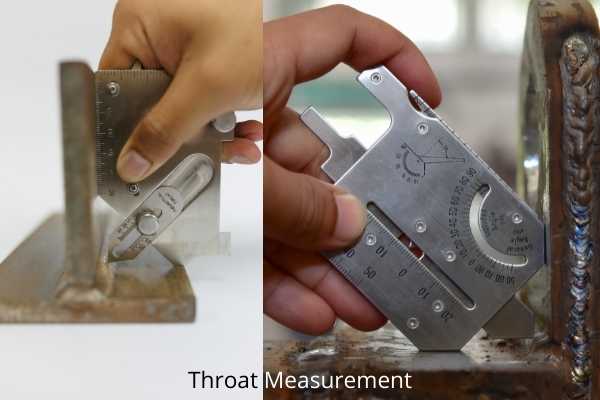
3. Check the Throat Thickness
Next up is the throat thickness – specifically, the theoretical or effective throat. This is the shortest distance from the root of the weld to its face. It's critical because it’s often considered the true measure of a weld's strength. Your gauge will have a feature designed for this. Place the gauge so the "throat" part bridges across the weld. It will show you if your weld has the necessary bulk where it counts. If you're using a Bridge Cam, there's typically a specific slider or pointer for this measurement.
4. Inspect for Undercut and Overlap
These are the little imperfections that can compromise a weld. An undercut is a groove melted into the base metal next to the weld, while overlap is when the weld metal extends beyond the toe of the weld. Many fillet weld gauges have small pointers or edges designed to detect these. Just slide the gauge along the weld joint, and if you see a gap or a lift where there shouldn't be, you've spotted an issue!

5. Compare with Specifications
Remember, your gauge is a tool for comparison. You'll need to know what the required weld size is for your project. This is usually detailed in blueprints or welding procedure specifications. Your goal is to ensure your measurements fall within the acceptable tolerance range. It's like checking the recipe for your sourdough – you know you need 500g of flour, not just "some" flour.
Practical Tips & A Little Extra Spark
- Practice Makes Perfect: The more you use your gauge, the more intuitive it becomes. Start with scrap pieces to get a feel for it.
- Know Your Standards: Different industries (automotive, construction, aerospace) might have slightly different standards or tolerances. Always be aware of the specific requirements for your job.
- Keep it Calibrated (Kind Of): While you don't "calibrate" a fillet weld gauge in the same way you would a digital instrument, ensure it's clean and undamaged. A bent or worn gauge is an inaccurate gauge!
- The Human Touch: Even with the best tools, a keen eye and a steady hand are invaluable. Your gauge is an extension of your own craftsmanship.
In a world increasingly focused on quality and precision, using a fillet weld gauge isn't just a technical step; it's a statement. It says, "I care about my work. I aim for excellence. I build things that last." It's about bringing that same mindful attention to detail you might apply to brewing the perfect cup of coffee or styling an outfit to your welding projects. It elevates your craft, turning a simple joint into a testament to durability and skill.
So, next time you're about to put down that welding gun, grab your fillet weld gauge. Give your masterpiece that final, confident check. It’s not just about meeting specifications; it’s about the satisfaction of knowing you’ve created something truly solid, something that stands the test of time – much like the small, deliberate actions we take every day to build a strong, resilient life.