
Hey there, fellow dreamers and do-it-yourself enthusiasts! Have you ever looked at a perfectly adorable cookie cutter, a unique piece of jewelry, or even a quirky little toy and thought, "Man, I wish I could make a hundred of those?" Well, guess what? You totally can! Today, we're diving into the wonderfully whimsical world of silicone mold making, and trust me, it’s not nearly as complicated as it sounds. In fact, it's downright fun!
Imagine being able to replicate almost anything your heart desires. From custom chocolates to personalized soaps, intricate resin art, or even those fiddly little parts that always seem to go missing – the power of creation can be yours! It’s like having a superpower, but instead of flying, you're making duplicates of cool stuff. How awesome is that?
What You'll Need For Your Mold-Making Adventure
Before we get our hands (metaphorically, with gloves!) dirty, let's gather our treasures. You don't need a fancy lab, just a few readily available items:
- A two-part silicone mold-making kit: This is your star player. Look for kits designed for beginners – they're usually super user-friendly.
- Your original object (the "master"): This is what you want to replicate. Make sure it's clean and dry.
- Mixing cups and stir sticks: Disposable ones are a lifesaver for easy cleanup.
- Gloves: Safety first, friends! Silicone can be sticky, and you want to protect your skin.
- A containment wall: This can be anything from Lego bricks (yes, really!), cardboard, or plastic sheets, sealed with hot glue or tape. Its job is to hold the liquid silicone around your master.
- Optional: A release agent: Depending on your silicone and master material, you might need this to ensure your master pops out easily. Check your kit's instructions!
See? Nothing too intimidating, right? You probably have half of this stuff lying around already!
Let's Get Molding! The Fun Part Begins
Alright, deep breaths! This is where the magic happens. We're going to transform a liquid into a flexible, reusable mold. It’s a bit like a science experiment, but with much cooler results.

Step 1: Prep Your Masterpiece
First things first, make sure your original object is squeaky clean and completely dry. If it's a bit porous (like wood or some types of clay), you might want to seal it with a clear coat to prevent the silicone from sticking permanently. Think of it as giving your original a little spa treatment before its big moment!
Step 2: Build Your Containment Fortress
Now, place your master object inside your chosen containment area. You want to make sure there's about half an inch to an inch of space all around your object and above it. This ensures your mold will be sturdy enough. Seal any gaps with hot glue – we don't want any silicone sneak-outs! Remember, we're building a little pool for our liquid silicone.
Step 3: Mix the Magic Goo
This is where precision comes in, but don't fret! Your silicone kit will have specific instructions for mixing the two parts (Part A and Part B). It's usually a 1:1 ratio by volume or weight. Measure carefully! Then, mix thoroughly but gently with your stir stick. Scrape the sides and bottom of your mixing cup to ensure everything is incorporated. Why gently? To avoid introducing too many air bubbles, which can cause imperfections in your mold. A slow, steady hand is your best friend here.
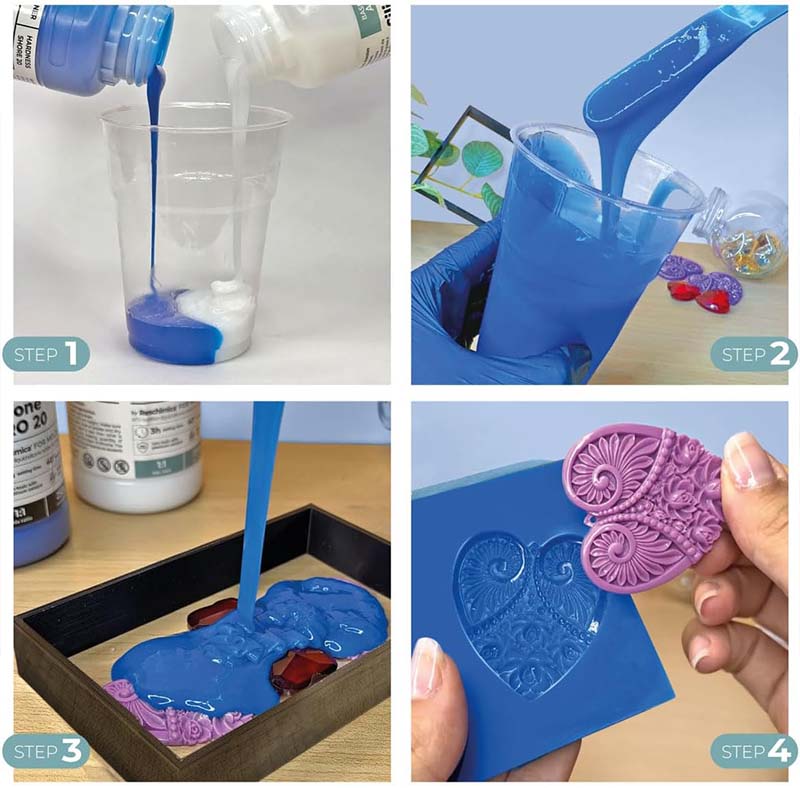
Step 4: The Great Pour
Hold your mixed silicone cup a few inches above your master object and pour it slowly into one corner of your containment box. Let the silicone gently flow around and over your object. This technique helps push any trapped air bubbles out from underneath your master. Keep pouring until your object is completely submerged and you have about half an inch of silicone above its highest point. It's oddly satisfying to watch, trust me!
Step 5: Cure and Demold (The Patience Test)
Now comes the hardest part for impatient creatives like us: waiting! Your silicone kit will specify a curing time, which can range from a few hours to overnight. Resist the urge to poke and prod! Once the time is up and the silicone is firm and no longer tacky, it's demolding time. Carefully dismantle your containment walls, and then gently peel your new, flexible silicone mold away from your original object. Ta-da! You've just made a mold!

Why This Is Your Next Favorite Hobby
So, you've made a mold. Now what? The possibilities are truly endless! You can cast soaps, candles, chocolates (if your silicone is food-safe!), plaster ornaments, resin figurines, concrete coasters, or even replacement parts for household items. Imagine creating unique, handmade gifts for everyone on your list, or bringing your wildest creative ideas to life. You're not just making a mold; you're opening a door to a whole new world of creation!
Beyond the practical applications, there's an incredible sense of accomplishment that comes with mold making. It's a blend of science, art, and a little bit of magic. It encourages you to look at everyday objects with fresh eyes, seeing potential where you once saw just a thing. Your imagination is truly the only limit.
So, what are you waiting for? Grab a kit, find an object you adore, and embark on your very own mold-making adventure. You might just discover your next favorite hobby, a fantastic way to express your creativity, and a super fun skill that will make your life (and gifts!) so much more personal and amazing. Go ahead, give it a try – you're going to love it!
