
Ever looked at a cool little trinket, maybe a quirky board game piece, a tiny sculpture, or even just a perfectly smooth river stone, and thought, "Man, I wish I had a dozen of these"? Or maybe you’re a baker (of sorts) and realized that custom cookie cutter just isn't cutting it anymore. Well, my friend, you've just stumbled upon the magical, slightly messy world of mold making for casting!
It sounds a bit like something a mad scientist would do in a dimly lit basement, right? But honestly, it's more like fancy adult Play-Doh with a really satisfying reveal at the end. We're talking about capturing the exact shape of something you love, so you can reproduce it again and again. Think of it as giving your favorite little object its own cloning machine. No actual cloning involved, just good old-fashioned chemistry and a dollop of patience.
The Grand Plan (aka What You'll Need)
Before we dive into the goo, let's gather our supplies. It's like prepping for a bake sale, but instead of flour and sugar, we're dealing with… less edible stuff.
First up, your Original Object. This is your star, your masterpiece, the thing you want to copy. Treat it like a newborn – clean, dry, and handled with care. No dust bunnies allowed!
Next, the Mold Material. For beginners, silicone rubber is your best buddy. It’s like the super-flexible, slightly more sophisticated cousin of modeling clay. Usually, it comes in two parts that you mix together, like a very precise, slightly alarming science experiment. Read the instructions on the package; they're not just suggestions, they're the sacred texts!

You’ll also need a Mold Box or Container. This is essentially a little fence or jail cell for your original object. It needs to hold the liquid mold material in place until it cures. You can get fancy with actual mold-making frames, or just go rogue with Lego bricks, sturdy cardboard taped together, or even a small plastic container. Just make sure it’s
Don't forget a Release Agent. Think of it as the ultimate "we're still friends, right?" spray between your original and the mold material. It prevents them from bonding forever, because commitment issues are real, even in the world of molds. This is especially crucial if your original object is porous or delicate.
Finally, some basic Mixing Tools: cups (plastic or silicone are great for easy cleanup), stir sticks, and maybe some gloves. Consider them your mad scientist lab equipment – just slightly less explodey.

Step 1: The Masterpiece's Moment in the Sun (or Silicone)
Time to prep your original object! Ensure it's sparkling clean and completely dry. Any little speck of dust or greasy fingerprint will show up on your mold, like that rogue crumb you missed when cleaning the kitchen counter. If using a release agent, apply it evenly now. It's like putting on sunscreen before a day at the beach – gotta protect that beautiful surface!
Step 2: Building the Great Wall (or a Tiny Box)
Position your original object inside your mold box. Make sure there’s enough space around it (at least half an inch to an inch) and above it for the mold material. This ensures your mold will be sturdy enough to handle future castings without flopping over like a tired pancake. Secure the object in place if needed with a dab of hot glue or a bit of clay at the bottom. We don't want it floating away like a tiny raft in a silicone sea!

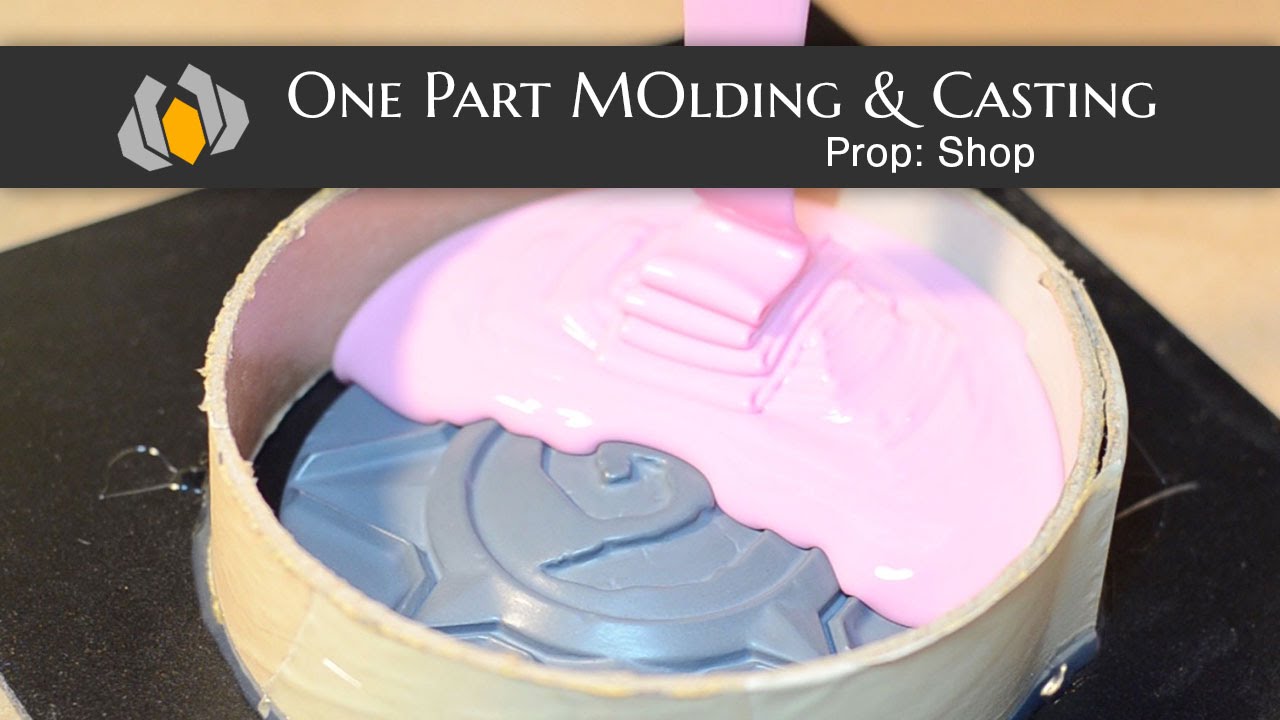
Step 3: The Gooey Goodness Begins!
This is where the magic happens! Carefully measure out your two-part mold material. This is
Now, pour the mixed material slowly and steadily into your mold box. Aim for the lowest point of your object, letting the material gently flow upwards and around it. This helps minimize trapped air bubbles, which are like tiny, uninvited party crashers ready to leave pockmarks on your perfect mold. You can even tap the sides of your mold box gently on the table to encourage any lingering bubbles to rise to the surface. It's like burping a baby, but for art supplies.
Step 4: The Patience Game (and the Big Reveal)
This is arguably the hardest part:
Once fully cured, it's time for the grand unveiling! Carefully dismantle your mold box. Then, gently peel the silicone mold away from your original object. It should feel pliable and rubbery, like a perfectly ripe avocado. That satisfying "pop" as your original object detaches is pure bliss. And there you have it! A perfect negative impression, ready to be filled with whatever casting material your heart desires.
Troubleshooting (Because Life Isn't Perfect)
Did your mold come out a bit lumpy, or with tiny craters? Those are likely air bubbles. Try pouring slower next time, or investing in a vacuum chamber if you get really serious (and fancy!). Is it still sticky after the cure time? You probably didn't measure or mix your two parts correctly. It happens! Learning is part of the fun.
Making a mold might seem intimidating at first, but with a little practice, some patience, and a dash of humor, you’ll be cloning your favorite tchotchkes like a pro. So go forth, embrace the goo, and happy molding!