Ever wanted to draw a hoodie that looks so cozy, you could practically dive into it? Well, grab your trusty pencil and a piece of paper, because today we’re embarking on a super fun, super chill artistic adventure! Forget complicated art school rules; we’re going to draw a hoodie that’s ready for a Netflix marathon or a cool evening stroll, and we’re going to do it with giggles and glee. Think of it less as "drawing" and more as "coaxing a cuddly piece of fabric onto your page." Ready? Let’s make some magic!
Get Ready to Doodle!
First things first, you’ll need a pencil (any old pencil will do, seriously, don’t overthink it!), an eraser (your best friend when experimenting), and some paper. Maybe put on your own favorite hoodie for inspiration? Or imagine your pet wearing one? The sillier the mental image, the better!
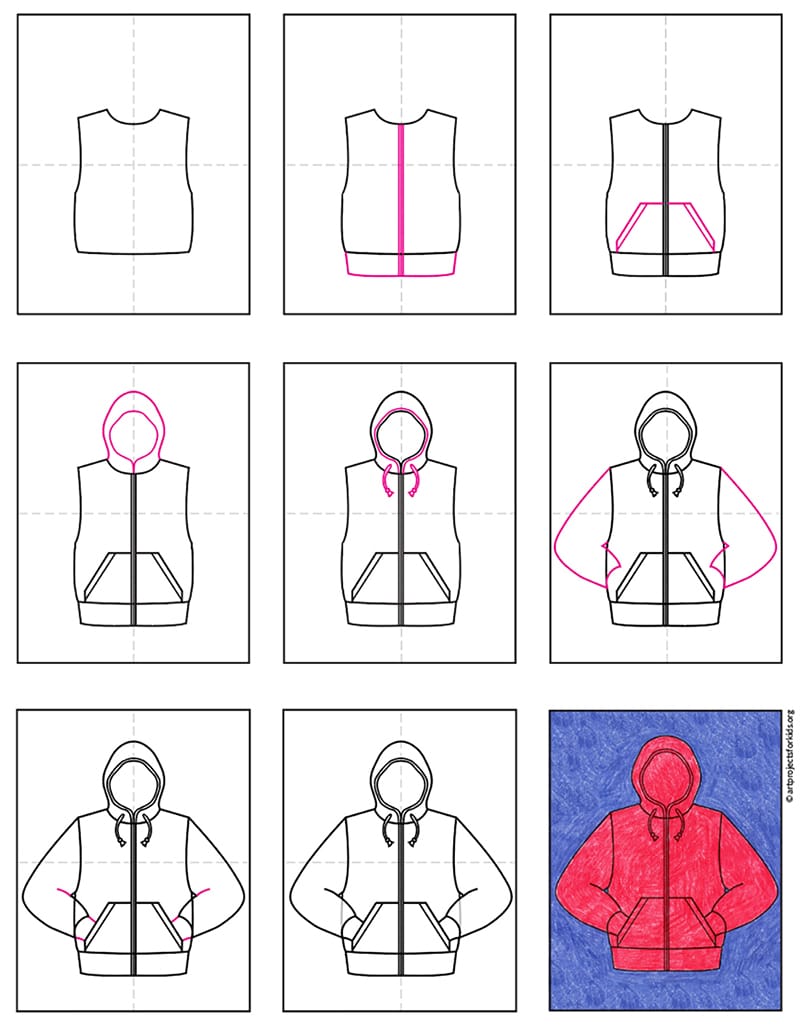
Step 1: The Great Body Blob (aka, the Main Shape)
Imagine a giant, comfy pillow. Or maybe a slightly lumpy rectangle with rounded corners. That’s our starting point! Draw a big, soft, slightly saggy rectangle shape for the main body of your hoodie. Don't press too hard with your pencil; these are just our guideline whispers. We want it to feel relaxed, not stiff. Think of it as the core of your hoodie, where all the warmth happens. It should look a bit wider than it is tall, like it's already settled into a comfy slump.
Step 2: The Hood-tastic Headpiece!
Now for the star of the show: the hood! Above your body blob, imagine someone wearing that hoodie and pulling the hood up. It’s not a perfect triangle, oh no. It’s more like a soft, rounded mountain peak or a cozy helmet. Draw a big, curved shape that starts from the shoulders of your body blob and rises up, then gently curves back down. It should look like it's cradling an invisible head. Think of it as a giant, soft taco shell for your head. Make sure it slightly overlaps the body blob; it’s sewn on, after all!
Step 3: Arm Wiggle Room (The Sleeves)
Time for the arms! From the sides of your body blob, extend two generous, slightly baggy tube shapes outwards. These are your sleeves. They shouldn't be ruler-straight; imagine them having a bit of swish and sway. Hoodies are all about comfort, so give those arms plenty of room to wiggle! Make them taper slightly towards the ends, like they’re ready for some cozy hand-tucking. You can even add a little curve to suggest an elbow bend if you’re feeling extra fancy, but don't sweat it too much.

Step 4: The Cuffs and Hem (The Snug Bits)
Now, let's make it look like a real hoodie! At the end of each sleeve, draw a slightly narrower, chunky band for the cuff. This is where the fabric snuggles around your wrist. Do the same for the very bottom of the hoodie body – a nice, thick band for the hem. These bands are usually a bit tighter and more defined than the rest of the fabric, so they might have a slight wrinkle or fold where they meet the looser parts. This gives your hoodie a lovely, finished look – like it just came out of the laundry and is ready to be worn!
Step 5: The Kangaroo Pouch (The Front Pocket)
Ah, the legendary front pocket! The perfect place for snacks, hands, or hiding from responsibilities. In the middle of your body blob, draw a large, rounded rectangle. This is the main opening. Now, from the bottom corners of that opening, draw two gentle curves that connect downwards to form the bottom of the pocket. It should look like a big, soft "U" shape that's attached to the bottom of the hoodie. It's often stitched down the middle and on the sides, but you can hint at that later. For now, just get that wonderfully capacious pouch drawn in!

Step 6: The Spaghetti Strands (The Drawstrings)
Almost there! Every good hoodie has those wonderfully impractical, yet undeniably stylish, drawstrings. Inside the opening of your hood, draw two parallel lines that curve downwards into the hood opening. These are your drawstrings disappearing into the fabric. At the bottom of the hood opening, where the strings emerge, draw two more lines that hang down. These can be straight, or you can give them a playful little loop or knot at the end. Don't forget the little metal or plastic tips (aglets, fancy word, right?) at the very end of the strings!
Step 7: The Wrinkle Whisperers (Folds and Creases)
This is where your hoodie comes alive! Fabric isn't flat; it folds, bunches, and creases. Add some gentle, curved lines to suggest folds, especially around the elbows, where the sleeves meet the body, and around the bottom of the hood. Think about where gravity would pull the fabric down, or where it would gather if someone was moving. These aren't harsh lines; they're soft whispers of movement and comfort. A few subtle lines around the pocket will also give it some depth. Don’t overdo it; a few well-placed wrinkles are way better than a whole crinkly mess!

Step 8: The Grand Finale (Erase & Shine!)
Now, for the big reveal! Take your eraser and gently, carefully, erase all those initial guideline whispers. Darken the lines you want to keep with your pencil. You can even add a little bit of shading under the hood, under the arms, and inside the pocket to make your hoodie pop! Imagine where the light would hit it and where shadows would naturally fall. You've just drawn a hoodie! A real, honest-to-goodness, ready-for-anything hoodie!
Congratulations! You just created a masterpiece of cozy proportions. Give yourself a high-five! Drawing should always be this fun and fearless. Remember, practice makes perfect, but play makes it enjoyable. So go ahead, draw another, draw a hundred! Add patterns, add logos, add a tiny cat peeking out of the pocket! The world is your hoodie canvas!