
Ever looked at a perfectly curved piece of furniture, a sleek bent metal railing, or even the elegant arc of a well-placed pipe and thought, "How did they get that so smooth?" Well, my friend, you're looking at the magic of a calculated bend radius! And guess what? It's not some secret arcane art reserved for engineering gurus. It’s a super fun, surprisingly practical skill that can level up your DIY game and help you appreciate the world around you in a whole new way.
Seriously, stick with me. This isn't just about math; it's about making things beautiful, functional, and frankly, cooler.
What in the World is a Bend Radius?
Okay, let's demystify it. Imagine you're bending a piece of material – a metal sheet, a pipe, even a thick piece of card stock. Instead of a sharp, crisp corner (which usually looks bad and can even break the material), you want a nice, gentle curve.
The bend radius is simply the radius of that inside curve. Think of it like drawing a circle: the radius is the distance from the center of the circle to its edge. When you bend something, you're essentially creating a segment of a circle. The smaller the radius, the sharper the bend. The larger the radius, the more gradual the curve.
It’s super important because every material has a minimum bend radius. Bend it sharper than that, and you're asking for kinks, cracks, or even a complete snap! Nobody wants that on their DIY masterpiece, right?
Why Should You Care? (Beyond Avoiding Disasters!)
Beyond saving your materials from an untimely demise, understanding bend radius opens up a world of creative possibilities.

1. Professional Polish: Ever seen a DIY project that just looks a bit... amateur? Often, it's the lack of smooth, intentional curves. Knowing your bend radius means your projects will have that factory-made, "I know what I'm doing" vibe.
2. Save Money (and Headaches!): No more wasted materials because you bent something too sharply and it buckled. You'll approach projects with confidence, knowing exactly how to achieve the perfect curve on the first try.
3. Unleash Your Inner Designer: Imagine designing custom shelves with elegantly curved supports, crafting unique jewelry pieces, or even bending conduits for home wiring that look purposeful instead of haphazard. Your creativity will literally bend to your will!
4. Material Mastery: You'll start to understand why some materials are more forgiving than others, and how to work with their properties, not against them. That's real power!

The "Math" Part (It's Friendlier Than You Think!)
Okay, deep breath! The idea of "calculating" might sound intimidating, but for most practical purposes, it boils down to a few key pieces of information and sometimes, a simple rule of thumb.
The Most Basic Rule: The Minimum Bend Radius (MBR)
For many materials, especially metals, there's a recommended minimum bend radius (MBR) often expressed as a multiple of the material's thickness (T). For example, you might see recommendations like "2T" or "3T."
- If your material is 1/8 inch thick, and the MBR is 2T, then your minimum bend radius is 2 * 1/8 inch = 1/4 inch.
- This means the inside of your curve should have a radius of at least 1/4 inch.
This "T" factor varies wildly depending on the material (aluminum is generally more forgiving than steel), its temper, and the bending method. A quick search for "minimum bend radius [your material type]" will usually give you this crucial number!
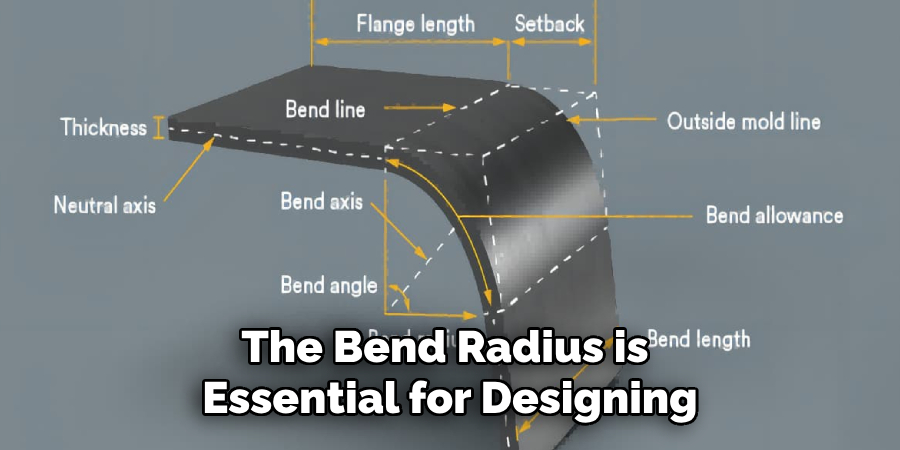
A Slightly Deeper Dive (Still User-Friendly!): The Bend Allowance
If you're getting serious, you'll encounter the concept of bend allowance. This is the length of material you need to "add" to account for the bend itself, because the material stretches on the outside and compresses on the inside.
At the heart of it, there's a mysterious "neutral axis" within the material – a line that doesn't stretch or compress during the bend. The bend allowance calculation often uses a formula like this (don't worry, calculators handle it!):
BA = A * ( π/180 ) * ( R + K * T )
Where:
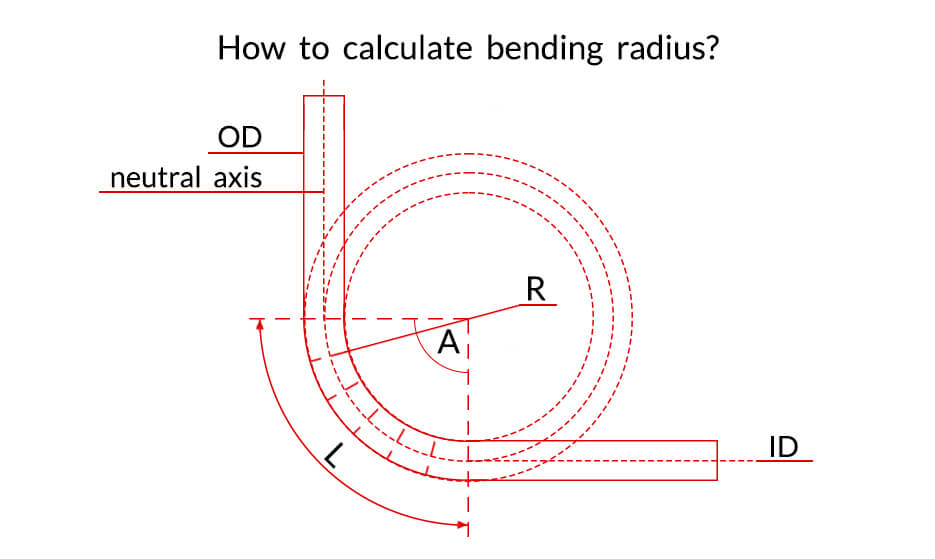
BAis the bend allowance (the length you add).Ais the bend angle in degrees (how sharp you want to bend it).Ris your desired inside bend radius.Tis the material thickness.Kis the K-factor (a material property, usually between 0.3 and 0.5 – again, easily found!).
See? You don't need to memorize that! What you do need to grasp is that knowing your desired bend radius, material thickness, and the bend angle are the keys. Many online calculators exist where you just plug in these numbers, and BAM! It tells you everything you need to know, including the flat pattern length required before you even make your cut. Isn't that empowering?
Your Next Steps to Becoming a Bend Boss!
1. Identify Your Material: What are you bending? (e.g., copper pipe, aluminum sheet, acrylic plastic). 2. Find Its MBR: Look up the minimum bend radius for your specific material and thickness. This is your safe zone! 3. Play with Calculators: Search for "bend allowance calculator" online. Experiment with different radii and angles. See how the numbers change! 4. Practice: Grab some scrap material and try it out! Feel how different radii affect the material and the final look.
Go Forth and Bend (Responsibly)!
Understanding bend radius isn't about becoming a math whiz; it's about unlocking a deeper understanding of the materials you work with and gaining the confidence to create precise, beautiful curves. It's about transforming a guess into a calculated, satisfying success.
So, next time you see a beautifully curved object, remember the unseen calculations that went into making it perfect. And then, remember that you have the power to create such beauty yourself. Go ahead, explore those curves, experiment with materials, and let your creativity bend to new possibilities. The world is full of curves, and now you hold the key to understanding and shaping them!