Ever felt that satisfying urge to just… make something? To take raw materials and fuse them into a creation of your own design? There's a primal joy in craftsmanship, whether you're baking a perfect sourdough or assembling a sturdy garden gate. And when it comes to the world of metal fabrication, few tools offer that immediate gratification quite like a good welding setup.
Today, we're diving into the nitty-gritty of one of the friendliest, most forgiving welding rods out there: the 3/32 6013. Think of it as the Swiss Army knife in your welding arsenal – versatile, reliable, and incredibly accommodating for both beginners and seasoned pros tackling everyday repairs and projects. It’s the kind of rod that makes you feel like a welding wizard, even on your first few passes.
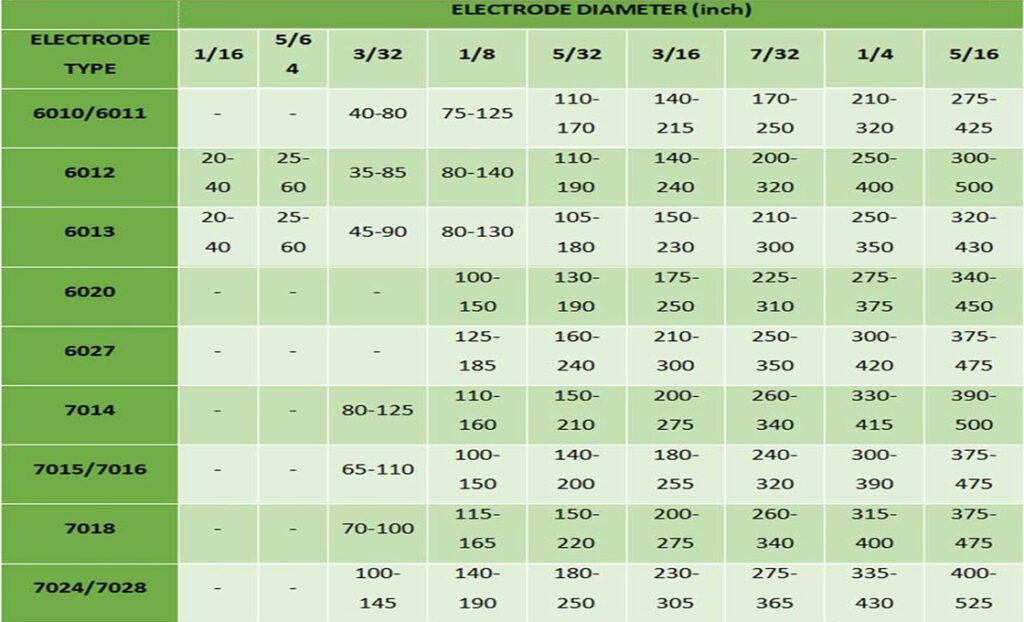
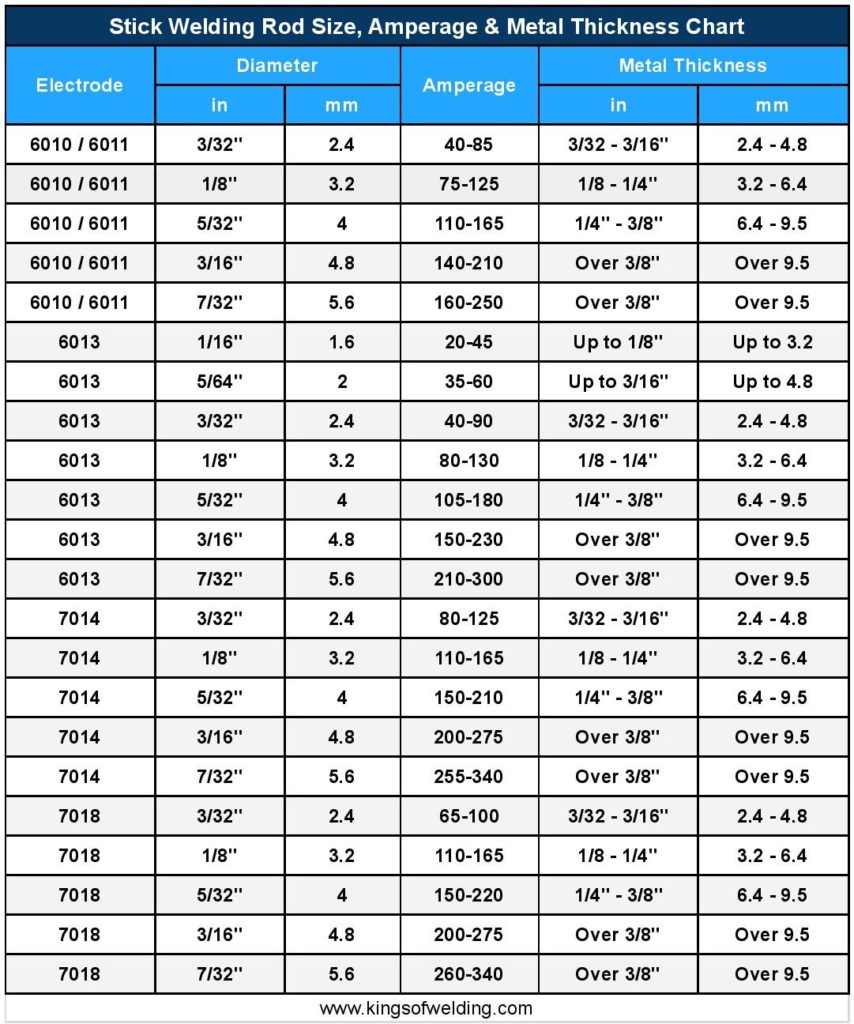
But even with the most agreeable tools, there’s a sweet spot, isn't there? For our 3/32 6013 rod, that sweet spot is all about the amperage. Getting it right is like tuning a guitar – too loose, and it's flabby; too tight, and it snaps. Generally, for a 3/32 6013 electrode, you're usually playing in the sandbox between 70 to 120 amps. But here's the fun part: it’s not a one-size-fits-all kind of deal!
Finding Your Amperage Nirvana
The perfect amperage isn't just a number; it's a feeling, a sound, a visual symphony. It's about finding harmony between your rod, your material, and your machine. Think of it like finding the perfect temperature for your morning coffee – too hot, and it scalds; too cold, and it's just not right.
First up, consider your material thickness. Welding thin gauge sheet metal, like that rusty lawnmower deck you’re trying to salvage? You'll want to lean towards the lower end of that 70-120 amp spectrum – perhaps 70-90 amps. Too much heat, and you'll blow right through it faster than a hot knife through butter, leaving you with a frustrating hole instead of a clean join.

Conversely, if you're tackling something a bit more robust, like 1/8-inch thick angle iron for a custom workbench, you'll need to crank up the juice. That's when you're likely to find your sweet spot closer to the 90-110 amp range. More metal demands more heat to achieve proper fusion and penetration.
Your welding position and desired penetration also play a role. Welding flat on a bench is usually more forgiving and might allow for a slightly higher amperage. However, when you're fighting gravity in a vertical or overhead position, you might want to dial it back just a tad to give yourself more control over the puddle. Deeper penetration often requires more amps, but with 6013, you're usually aiming for general purpose fabrication where moderate penetration is key.
Lastly, don't forget your welding machine itself and your personal technique. Some machines run a bit "hotter" or "colder" than others. And your arc length – how far you hold the rod from the workpiece – will significantly impact the heat transfer. A shorter arc generally means more focused heat and a more stable puddle.
Pro Tips for a Perfect Puddle
So, how do you really nail that amperage? It’s all about experimentation and observation, just like perfecting a new recipe.
Start Low, Adjust Up: This is the golden rule. Begin at the lower end of the recommended range (say, 80 amps for 3/32) and make a test bead on some scrap metal of the same thickness. If the arc feels sluggish, the puddle is too cold and lumpy, and the bead is crowned and piles up, bump it up 5-10 amps. Keep going until you see and hear what you like.

Listen to the Sizzle: A truly happy arc sounds like bacon sizzling – a consistent, crisp crackle. If it's too quiet or sputtering irregularly, your amperage might be too low or your arc length too long. If it's a harsh, violent roar, you're likely running too hot.
Watch the Puddle: The molten puddle should be smooth, shiny, and flow nicely, like a small pool of lava. It should wet into the base metal beautifully without being too runny (too hot) or too stiff (too cold). With 6013, you'll also notice a relatively thick, easy-to-remove slag that peels away like a well-baked pie crust when the weld cools.
Practice Makes Perfect: Seriously, grab some scrap. Old bed frames, discarded rebar, forgotten fence posts – anything goes. The more you practice, the more intuitive the amperage adjustment becomes. It’s like learning to ride a bike; eventually, you just feel it.
And, of course, a quick but crucial reminder: always wear your personal protective equipment (PPE) – helmet, gloves, jacket, and sturdy boots. Safety isn't just a suggestion; it's the foundation of every successful project!
Beyond the Bead: A Life Lesson
Isn't it fascinating how finding the "sweet spot" for a 3/32 6013 welding rod at just the right amperage mirrors so many aspects of life? Whether it's perfecting a skill, balancing your daily routine, or even finding the right "heat" in a relationship, it often comes down to observation, subtle adjustments, and a willingness to try again.
The journey of learning, making mistakes, and finally achieving that perfect, consistent bead with your 6013 rod is incredibly rewarding. It teaches patience, precision, and the power of persistence. So go on, grab that rod, dial in that amperage, and create something awesome. You might just find that the process of welding itself is a beautiful metaphor for crafting a fulfilling life.